
User's Guide
- version 1.0 -
Content
1. Getting started
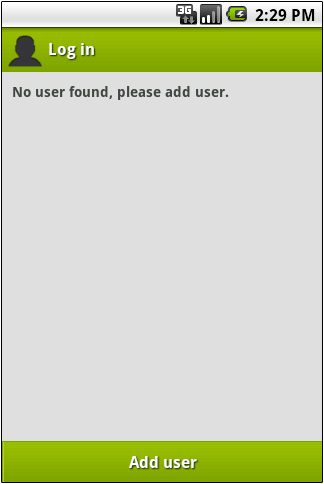
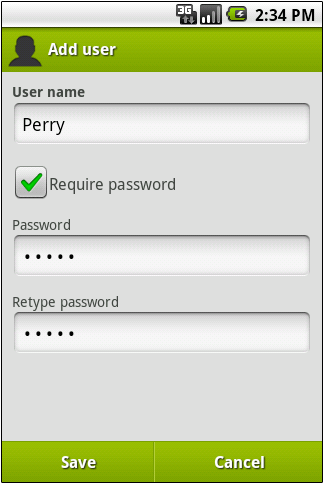
1.1 Create a user
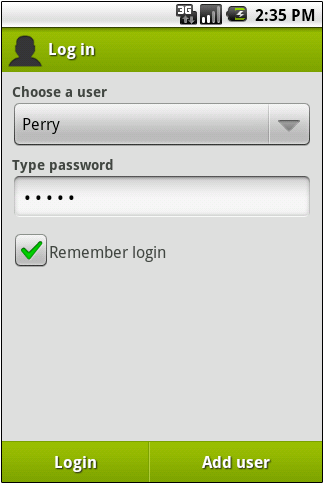
The first time the application is launched you have to create a user profile. Tap the button 'Add user'. Insert your user name and optionally a password. Tap the 'Save' button. Your user profile is created, you can now login to application.
1.2 Login to application
Select user from the list. If selected user profile requires password, you have to type it. You can check 'Remember login' option if you want to be logged in with selected user profile next time you launch the application. You can logout in Profile tab (see 2.3).
Screenshots of creating a user profile and logging into the application
2. Main part of the application
After logging the main part of the application is shown. It consists of three tabs and ActionBar. ActionBar is used for quick and easy access to common tasks and for displaying important informations (such as user name, currently selected car and its photo, see picture below). Its functionality depends on currently selected tab. ActionBar is also used for notifications (see 7).
Screenshots of ActionBar and tabs
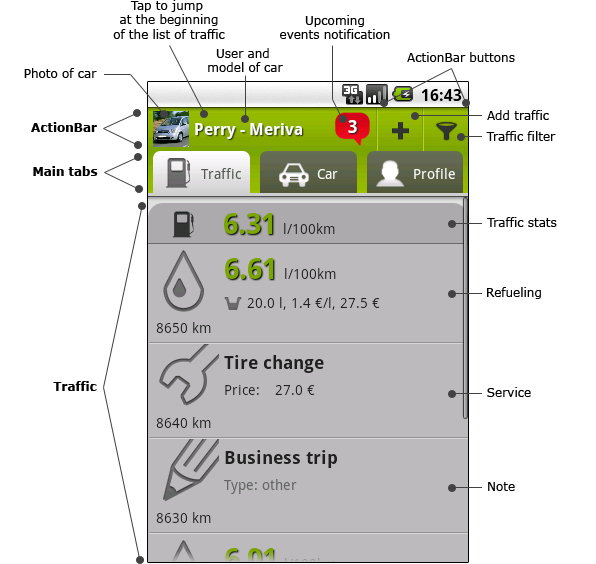
2.1 Traffic tab
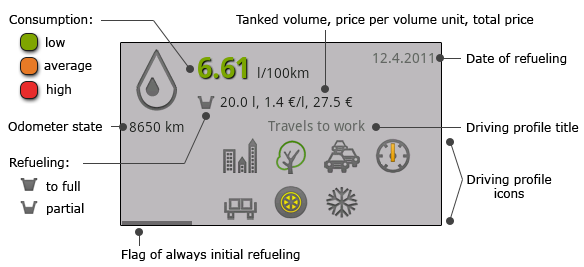
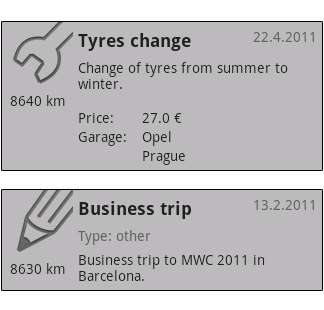
Traffic tab consists of list of selected car's traffic. It is ordered descending by state of odometer and it contains items of three types: refueling, service and note. By tapping it, you can display additional information about the item. ActionBar buttons provide quick and easy access to adding new traffic (see 4) or setting traffic list filter (see 6). By tapping any other part of ActionBar (beside buttons), the list of traffic will jump to its beginning.
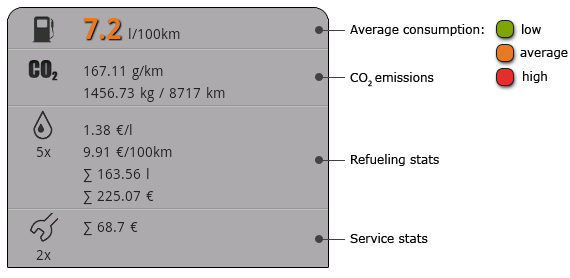
At the beginning of the traffic list, there is a special item displaying stats. Major information is car's average consumption. By tapping stats item, you can display additional stats - carbon dioxide emissions, average fuel cost and total costs of refueling and services.
Screenshots of refueling list items displaying additional informations
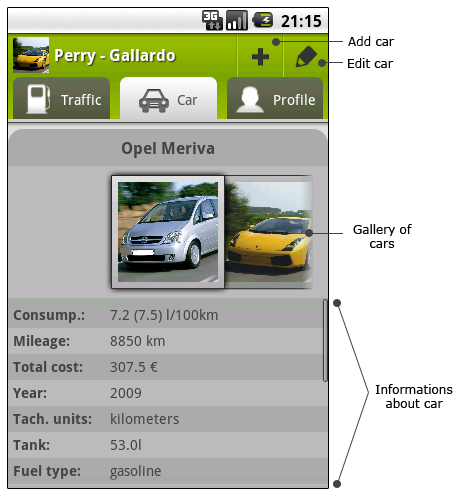
2.2 Car tab
Car tab is used for administration of your cars. In this tab, you can browse, add, edit or delete your cars. There is a gallery showing photos of your cars. If you select a car in the gallery, information about it is displayed below. You can select car by tapping its image in the gallery - its photo and model will appear in ActionBar and Traffic tab will show this car's traffic. By tapping ActionBar buttons, you can easily add a new car (see 3) or edit a car that is selected in the gallery. You can also perform these actions by pressing Menu button or by long-pressing car's image in the gallery.
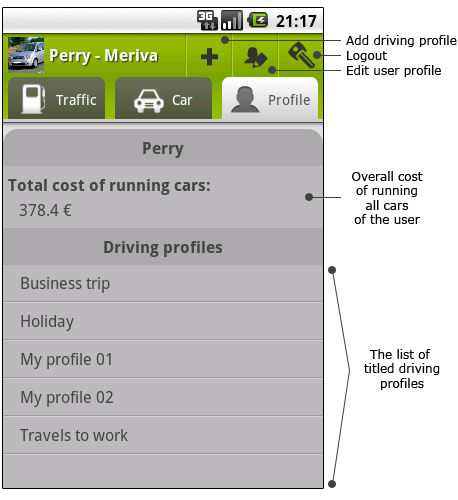
2.3 Profile tab
Profile tab is used for administration of your user profile and your titled driving profiles (see 5). In this tab, you can edit your user name or password. You can even delete your user profile or add new one. In addition you can add, edit or delete your titled driving profiles. ActionBar buttons are used for quick adding new titled driving profile, editing user profile and logging out. After logout the login screen is displayed, see 1.2.
3. Add car
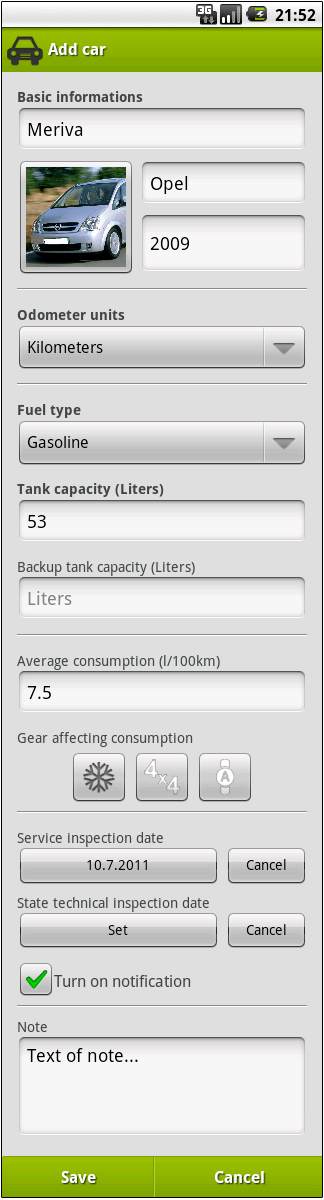
If you want to add a new car, switch to Car tab and tap '+' button in ActionBar (or press Menu->Add). The Add car form will appear. Bold items are required. Enter car model, manufacturer and year of manufacture. Model will be shown later in ActionBar as well as car's photo, which can be added by tapping square-shaped button with car logo.
Next, enter odometer units of your car (kilometers, miles), fuel type (gasoline, diesel, LPG), tank capacity or optionally backup tank capacity. Please make sure that you have entered (backup) tank capacity correctly, because these values cannot be edited, when you enter car's refueling.
Next, you can enter average consumption of your car. Typing this value is not required, but it is strongly recommended. If you type it, car's consumption in Traffic tab will change its color according to this value - low, average or high consumption. It is also used for filtering the traffic (see 6). The deviation that determines whether the consumption is still average can be set in application preferences (see 8).
Next, you can choose gear that might affect car's consumption. You can display help by long-pressing a gear icon.
Next, you can set dates of service inspection and state technical inspection (STC - state technical control). If you check 'Turn on notification' field, you will be notified that date is approaching in ActionBar (see 7). In application preferences (see 8) , you can set how much in advance you wish to be notified (3 days, week, month, ...). Eventually you can add a note that will be shown in car's information.
If you have all your information entered, tap 'Save' button. The same form is also used for editation.
Screenshot of filled form for adding/editing a car
4. Add traffic
If you want to add a new traffic, switch to Traffic tab and tap '+' button in ActionBar (or press Menu->Add). Then select from the dialog menu whether you want to add refueling, service or note. If you want to add a new traffic, a car have to be selected (its model is displayed in ActionBar). By long-pressing an item in traffic list, you can edit, delete or hide the item (hiding works only for refueling items - it is used for filtering, see 6).
When you select an item you want to add from dialog menu, the appropriate form will appear. Bold items are required. All three types of traffic items have fields for typing state of odometer and date. While date is optional, state of odometer is required, because it is used for ordering traffic list and also for finding out distance traveled since last refueling (when consumption is calculated).
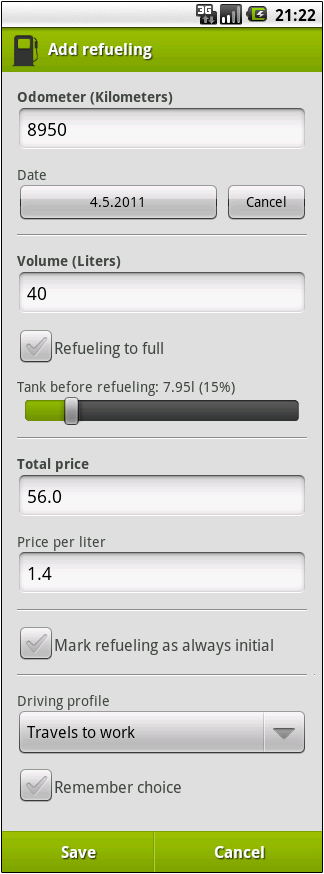
4.1 Add refueling
First, enter the volume of fuel tanked. If you refueled to full tank, check field 'Refueling to full'. Otherwise, set approximate state of the tank before refueling using 'Tank before refueling' seek bar.
Next, enter the price for refueling. You can type total price or price per unit of volume (e.g dollar per gallon). The other value will be calculated automatically.
You can 'Mark refueling as always initial'. This option causes that refueling will behave as if it was the very first - any previous refueling will be ignored. It is useful especially when you forget to add a couple of refueling - sequence of refueling is torn, but you can continue adding new ones.
The last item is the driving profile. You can create new one or use profile that is already saved (titled driving profile), see 5 for more information.
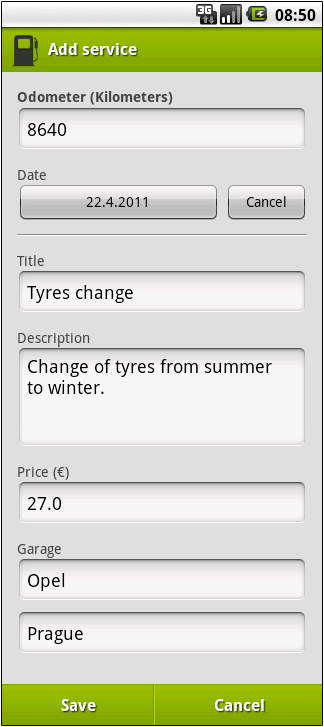
4.2 Add service
You can enter title, description, price and name and address of garage.
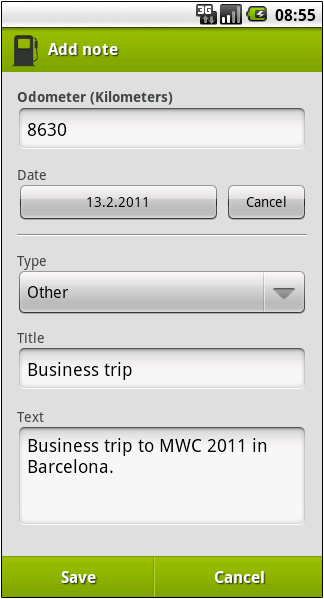
4.3 Add note
You can enter type (other, good or bad experience), title and text. Type of note is used as one of attributes of traffic list filter (see 6).
Screenshots of filled forms for adding/editing refueling, service and note
5. Driving profiles
Driving profiles define the way and style of driving since previous refueling. It is mostly used for filtering car's traffic - e.g. it is possible to find out average consumption when you are using winter tyres or when you are stuck in traffic jam etc. There are two kinds of driving profile - untitled and titled.
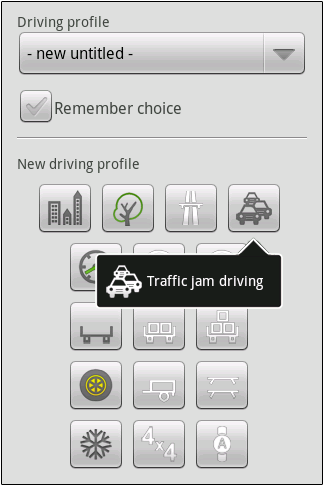
5.1 Untitled driving profiles
One untitled driving profile is defined once in single refueling item. It does not have a title and it is bound only to the refueling in which you defined it. It is possible to edit or delete it, but only when you editing the refueling item in which you defined it.
To enter untitled driving profile, select '- new untitled -' from 'Driving profile' item when you adding or editing a refueling. A grid of driving profile icons will be shown. You can display help by long-pressing an icon.
Screenshot of untitled driving profile definition
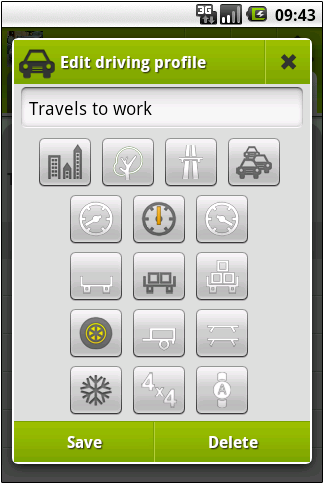
5.2 Titled driving profiles
Titled driving profile has got a title and it is reusable for more than one refueling. It can be defined at two locations, when you adding/editing refueling select '- new titled -' from 'Driving profile' item, or switch to Profile tab and tap '+' button in ActionBar (or press Menu->Add driving profile). When you adding/editing a refueling, you can select driving profile from already created titled driving profiles in 'Driving profile' item, so you don't have to define the same profiles all over again.
You can manage your titled driving profiles in Profile tab. There is a list of all your titled driving profiles. When you tap profile in the list, the window in which you can edit or delete this profile will be shown. You can display help by long-pressing one of driving profile's icon.
Screenshot of the window for add/edit/delete titled driving profile
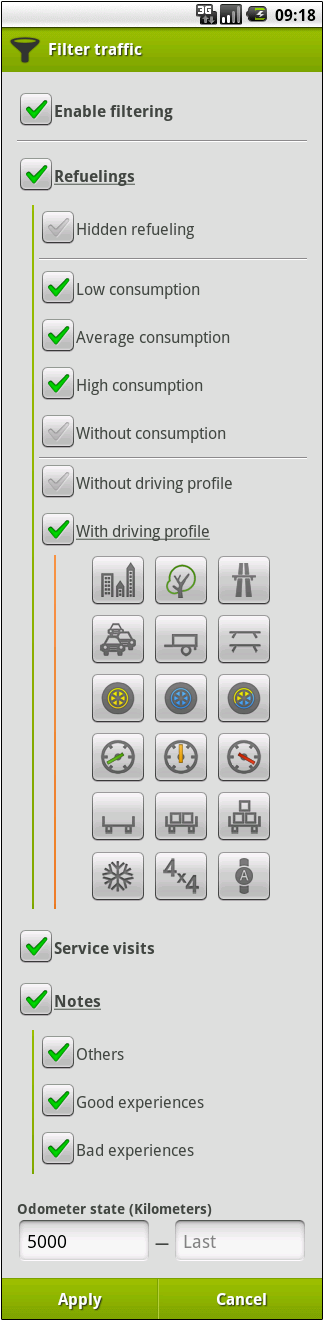
6. Traffic filter
You can filter the list of your car's traffic in Traffic tab, so that it shows the only informations you want. To define and apply filter, switch to Profile tab and tap thr 'funnel' button in ActionBar (or press Menu->Filter). Stats in Traffic tab are always calculated according to current filter (from items curently displayed in the list of traffic). Each user has one filter which he can define and apply or disable. If you define and apply traffic filter, it stays defined and applied even if you change a car or restart application (until you disable it).
If the filter is disabled, all car's traffic imtes are displayed in the list of traffic. If it is enabled, you can filter traffic by type of item (refueling, service, note). If any type is not checked, no items of this type will be shown in car's traffic list.
Refuelnig items have additional criteria. You can filter out hidden refueling, or you can filter by consumption (low, average, high) or driving profile. If the car doesn't have average consumption defined, the low, average and high consumption criteria are ignored. If you define driving profile in traffic filter, every refueling that has at least one attribute you defined will be shown in the list of traffic (of course if it is not filtred out by other criterium, such as low consumption etc.). You can display help by long-pressing one of driving profile's icon.
Note items are filtered according to their type (other, good or bad experience). You can also filter by state of odometer - enter initial or final state (or both) and the list of traffic will only display the items that fall into this interval.
Screenshot of traffic filter definition
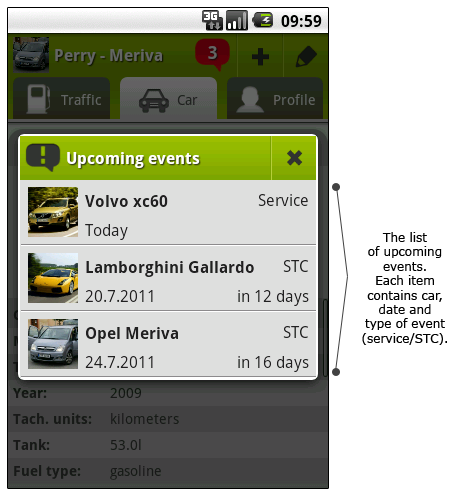
7. Upcoming events notification
You can be notified about upcoming service inspection or state technical control date - red icon with number of upcoming events appears in ActionBar (see ActionBar screenshot). Notifications can be enabled or disabled both generally (in application preferences) or locally for each car (in Car tab). In application preferences (see 8), you can set how much in advance you wish to be notified (3 days, week, month, ...) - this applies generally.
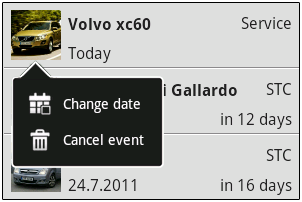
If you tap the notification icon in ActionBar, a dialog window with the list of upcoming events (inspection dates) appears. Each event contains identification of the car (photo, manufacturer and model), date, number of days left and type of event (service inspection or STC). If you tap the event in the list, you can change its date or cancel it.
Screenshots of upcoming events dialog window
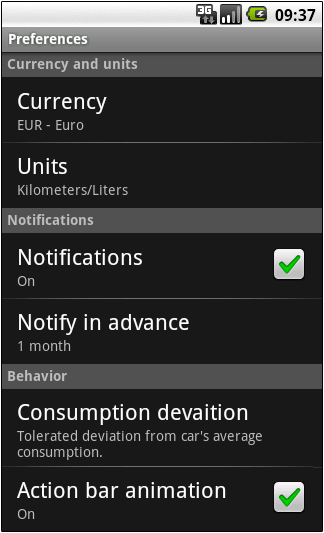
8. Preferences
In every tab, you can access application preferences by pressing Menu->Preferences. It is divided into three categories: Currency and units, Notifications and Behavior.
8.1 Currency and units
You can change currency and units that are used within the application. If you change currency, you will be prompted for exchange rate. All prices will be multiplied by this exchange rate. Application supports standard units used in Europe and USA. If you change units, all values will be converted appropriately.
8.2 Notifications
You can enable or disable all notifications and set how much in advance you wish to be notified (3 days, week, month, ...).
8.3 Behavior
You can set the deviation that determines whether the consumption is still average or it is low or high. If you have car's average consumption defined, the consumption in Traffic tab will be sorted into these categories. This enables consumption color differentiation and additional filtering options.
Example:
Consider that defined average consumption of the car is 7.5 l/100km and consumption deviation is set to 0.5. Then consumption that is lower than 7 l/100km is classified as low. Consumption that is greater that 8 l/100km is classified as high. Consumption that falls into interval from 7 to 8 l/100km is classified as average.
Next, you can enable or disable ActionBar buttons animation when you are switching between tabs.